
| Home | Current Inventory | Projects | Services | Company | Stuff | Bob's Car Collection | Contact Us |
|
on Facebook |
"Full Inventory" (Projects, Completions and Personal Collection) |
 77 Lancia Scorpion |
 67 Camaro RS Conv. |
|
68 Austin Healey Sprite |
 68 Cougar |
 69 Corvette |
 70 Opel GT |
 69 Marcos 3000GT |
 86 TVR 280i |
 73 TVR 2500M |
 90 Buick Reatta |
1958 CHEVROLET
|
Client Project |
Frame-Off Restoration |
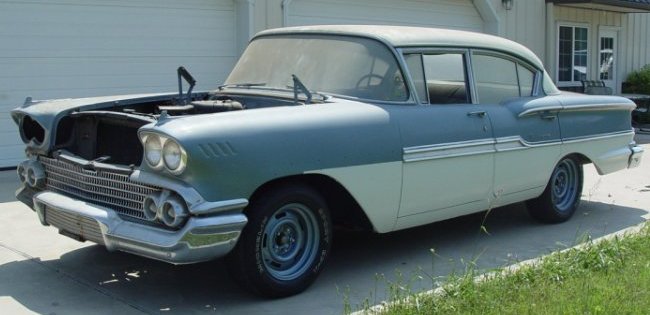 |
"Grandmother's '58 comes to us by way of a hard-core car guy who had to give up on restoring it himself after realizing he just wasn't up to the task anymore. But, rather than just giving up, he made the decision (in our minds, the right one) to have the restoration completed by a shop that has as much of a passion for classic cars as he does.
This 1958 Chevrolet Biscayne has been in the family since his wife's grandmother bought it new. So - like many of our restorations - this is a car guy's idea of a "family heirloom", and it will be treated with the same loving respect as you would expect to be given to any precious heirloom.
However, this won't be any ordinary Biscayne when we're finished with it. Don (the owner) had already done a 4-wheel disc brake conversion and installed Hellwig anti-sway bars front and rear. He also supplied a Chevy LT1 crate engine. Since we retrieved the project, he's also acquired a 700R4 automatic overdrive transmission and a rack-and-pinion conversion kit. A custom interior is also planned. So, when we're done with "Grandmother's '58", it certainly won't be something you're likely to see being driven by your typical granny!
|
AS RECEIVED | ||
|
As you can see in the photos below, "Grandmother's '58" sat for a number of years before we picked it up. In addition to a thick layer of dust, several mud daubers took up residence in a variety of places. Like many restoration projects that have been put "on-hold", parts are scattered about inside and age has taken its toll on the interior. But, that will all change soon enough.
|
||
|
|
||
|
|
||
DISASSEMBLY | ||
|
Disassembly of the Biscayne was straightforward with really no unexpected problems. The nice thing about these big old cars is that there's plenty of room in the engine bay and under the dash. So, access is much easier - and less painful - than some of the smaller sports cars we see. As expected (and noted by the client), the rear floor pans and trunk pan will require replacement due to rust. The only real surprise was the amount of rust - and rust-through - in the right corner of the rear window. We'll have to make some sheetmetal patches for that area.
|
||
|
|
||
|
|
||
SODABLASTING | ||
|
If you want to reveal all the problems underneath a car's exterior, sodablast it. The entire exterior of the main body (excepting the front clip), door jambs, trunk lip, trunk pan, floor pans and dash took less than 6 hours to blast clean.
Beneath the paint, we found that the left front door and both right doors had seen significant bodywork in the past - as evidenced by the rows of holes used to pull the metal back into shape. The work was actually quite good, but after blasting away the body filler, we will have to redo that work. Aside from the aformentioned rust-through spot at the rear window frame, no notable rust issues were found. All-in-all, we've got a very solid body.
|
||
|
|
||
|
|
||
SHEETMETAL REPAIR | ||
|
For a 53-year-old car, this Biscayne suffered from very little body rot. In fact, aside from some rust-through around the right corner of the rear windscreen frame, the only panels requiring replacement from rust damage are the rear floorpans and the trunk pan. The window frame damage was a simple matter of cutting out the affected area and welding in a couple of small pieces of sheet steel that were pretty simple to fabricate. When it came to the trunk pan, the client-supplied replacement pan proved to be a bit of a problem. First of all, it came in two pieces. Secondly, the panels were thinner than the originals, made of softer metal, and they just didn't fit worth a darn. The fact that the rust had extended beyond the reach of the new trunk pan panels didn't help matters either. Despite all that, after some serious cutting, tweaking and patch fabrication, the two-piece (now more like 6 or 8-piece) trunk pan was welded into place. Fortunately, the rear floor pans were of much higher quality and fit like a glove.
|
||
|
|
||
|
|
||
BODYWORK | ||
|
With the body fully stripped via sodablasting, we were able to get a better look at what we were up against. We had already been told about rust-through concerns in the trunk and rear floorpans. And the driver's side front fender had suffered some damage in the past. The client had provided a replacement fender, but it was pitted so badly with rust that we opted to repair the original fender. What did come as a surprise is that both sides of the car had apparently fallen victim to side-swiping incidents. The passenger side involved both doors, but the driver's side got away with just front door damage. What little body damage remained were mostly door dings and some hail dents - all of which was easily repaired.
|
||
|
|
||
|
|
||
FRAME & CHASSIS | ||
|
Since we needed to replace the body mount bushings (good thing since we discovered that 2 of the 6 body mount bolts were missing), it was simply a matter of holding the lift's UP button a few seconds longer to turn this into a "frame-off" restoration.
The nice thing about having a bodyless frame in front of you is that it is just so much easier to clean and refinish. So, we attacked it with our pressure washer. When that turned out to be inadequate for removing some of the caked-on crud, we turned to the old hamer-and-chisel method. After that got most of the really thick stuff off, we went after the rolling frame assembly with our sodablasting rig. With the frame free of 50+ years of grease, grime and caked-on crud, we prepped it with POR-15's Metal Ready acid wash and sprayed it with their rust-preventative coating.
We had already rebuilt the front suspension prior to removing the body. So, next the rear suspension was disassembled, media blasted, recoated and all new bushings were installed before reassembling it with a new rear axle. Yes, this Biscayne will be putting power to the ground via a custom-made Ford 9" limited-slip rear axle with Wilwood disc brakes.
A UNISTEER power rack & pinion steering unit was installed along with an IDIDIT tilt steering column to improve steering feel and precision. The front springs were replaced with 1 1/2" drop springs to give this Biscayne a more aggressive stance.
|
||
|
|
||
|
|
||
ENGINE & TRANSMISSION | ||
|
This Biscayne started life with a 283 V8 and automatic transmission. While it was in running/driving condition before being put into storage years ago, its owner has opted for something with better performance and reliability. Some years ago, he came across a new old stock Chevy LT1. It is one of Chevrolet's earliest Corvette crate motors from 1993. It circulated through two prior owners before landing in the garage of our client. But, it had never been installed in a car.
Despite being "new", it became quickly apparent that it had been at least partially disassembled at some point. So, we felt it was prudent to disassemble it down to a short block assembly for a thorough inspection. Besides, disassembly would provide us with the best means of painting the engine to the client's liking. Aside from finding a number of finger-tight fasteners and some missing pan bolts, everything looked to be in order. So, after rechecking that all the main and rod bearing caps were properly torqued, the short block was reassembled with new seals & gaskets, then painted to match the car's blue/gray body color.
Engine internals were left as original except for the addition of roller rockers. The heads and water pump were left in natural aluminum. The block, intake and custom valve covers were painted in PPG body color with a clear coat after stripping all paint from the intake and valve cover fins. The aluminum components of the fuel injection were polished to a nice gloss.
A new surpentine belt system purchased from (Street & Performance) was installed after the engine and transmission were mounted in the chassis.
Power will be delivered to the rear axle via a remanufactured 700R4 (4L60E) transmission.
|
||
|
|
||
|
|
||
FUEL SYSTEM | ||
|
The conversion to a fuel-injected engine necessitated a complete reworking of the fuel system. A stainless steel replacement fuel tank (designed for fuel injection) was fitted in the same location as the original. The tank includes an integrated in-tank fuel pump. The LT1's fuel rails were modified (by Street & Performance) to include braided stainless fuel lines with the hard-line section of the fuel lines exiting behind and below the fuel rails rather than above them as originally equipped for the Corvette. A billet fuel filter was mounted near the fuel tank with braided stainless fuel line providing a flexible connection to the hard lines running front-to-rear. These hard lines were fabricated out of 3/8" O.D. aluminum tubing terminating in custom-fabricated bulkheads welded to the frame at each end and properly clamped at regular intervals to ensure no stress-related problems due to vibration or flexing. All hose and line ends are terminated with proper aluminum AN fittings.
|
||
|
|
||
|
|
||
ENGINE BAY | ||
|
Normally, we wouldn't break out a separate section here for an engine bay. But, since this project has evolved into more of a show car than daily driver, the engine bay will be finished to a level that deserves individual attention. The firewall and inner fenders receive the same paint as the exterior body - in metallic silver/gray. The battery will be relocated to the trunk to provide for a cleaner look. A Griffin aluminum radiator and electric fan will provide cooling. The remainder remains as-yet undetermined, but rest assured that it will be worthy of showing off at shows.
|
||
|
|
||
|
|
||
INTERIOR | ||
|
Initially, the customization of this Biscayne was going to be limited to the drivetrain, suspension and some relatively minor interior modifications. Bucket seats from a 2007 Camry along with a 69 Chevy center console were the primary changes the client had in mind - along with inserting an Impala rear speaker grill into the rear seat.
|
||
|
|
||
|
While fabricating mounts for the bucket seats, it quickly became apparent that the vintage console would be dwarfed in this large car when planted between the new seats. And the Impala rear seat back would not fit into the Biscayne, so the original seat frame would need to be modified to accomodate it. While mulling over the situation, the idea of fabricating a full-length console (from dash to rear package tray) that would cut between not only the front seats, but also a pair of rear bucket seats. The client was so enamored with the rough drawings that the project's scope was expanded to include a fully custom interior based on use of 4 bucket seats and full console.
The console incorporates a 60s vintage Chevy "Horseshoe" shifter and shifter trim plates (front and rear) from a '69 Camaro. In the photos, you'll see our rather tall (6', 5") client sitting in the Camry seats for an initial fitting so we could place the shifter and console armrest in the optimal position for him. The fabrication of the console started in cardbord and quickly progressed to a more rigid insulating fiberboard to get the initial shape nailed down. At several points throughout the process, the client (and - on occasion - his wife) came out for additional fittings to ensure that the armrests and shifter positions are optimal. Once the fiberboard mockup of the console was approved, the rear bucket seats were mocked-up in cardboard.
The wooden structure of the console is topped by a 5mm thick plywood "subfloor" that supports formed plastic trim panels in the front and rear. These trim panels provide mounting structures for the shifter trim plates (one of which was shortened to make the plate for the rear), window switches, DC accessory power outlets and (of course) cup holders. The primary console structure will be covered in leather/vinyl - as will the trim plates. The lower section of the console will be covered in carpet to provide a clean line separating the floor from the console.
A/C vent bezels from a '68 Mustang/Cougar are perfect miniatures of the larger OEM vents that we'll be using in the dash. So, we've mounted a pair up front and another pair in the rear. The rear vents will be controlled via one of the factory slider controls that remains unused with the Classic Auto Air system. That will allow the driver to cut airflow to the rear seats in order to maximize cooling up front.
|
||
|
|
||
|
Initially, the client wanted us to embed an Impala speaker grill into the rear bench seat - as they were on early Impalas. That desire eventually lead to the fabrication of the full-length console splitting custom rear bucket seats and accomodating a custom Corvette-styled "waterfall" to separate the seats and house the speaker grill. To finish off the look, a custom double-hump package tray was fabricated as were flowing trim panels on the outside of each bucket seat. The waterfall, package tray and side trim panels will all be covered in leather/vinyl to coordinate with the top panel of the center console.
|
||
|
|
||
|
With everything else we've done in the interior, the original dome light just wouldn't cut it. So, fabrication of an overhead console was commissioned to house two pair of push-on/off dome lamp assemblies from a Chevy Tahoe. Since we're there, the client is also having us install a GM "Homelink" module for garage door activation.
Since every modification cascades into even more customization, we've realized that the original rearview mirror (mounted on the header frame) will have to be replaced with a windshield mounted unit. So, we will be installing one that includes a compass and auto-dimming. We will also be forced to fabricate custom sunvisors to accomodate the width of the overhead console.
|
||
|
|
||
|
|
| |
| Send Mail to |
| bob@midlifeclassics.com |
| |