on Facebook
"Full Inventory"
(Projects, Completions and Personal Collection)

77 Lancia Scorpion

67 Camaro RS Conv.
68 Austin Healey Sprite

68 Cougar

69 Corvette

70 Opel GT

69 Marcos 3000GT

86 TVR 280i

73 TVR 2500M

90 Buick Reatta

| Home | Current Inventory | Projects | Services | Company | Stuff | Bob's Car Collection | Contact Us |
|
on Facebook |
"Full Inventory" (Projects, Completions and Personal Collection) |
 77 Lancia Scorpion |
 67 Camaro RS Conv. |
|
68 Austin Healey Sprite |
 68 Cougar |
 69 Corvette |
 70 Opel GT |
 69 Marcos 3000GT |
 86 TVR 280i |
 73 TVR 2500M |
 90 Buick Reatta |
1980 MGB |
Client Project |
Restoration & Engine Swap |
 |
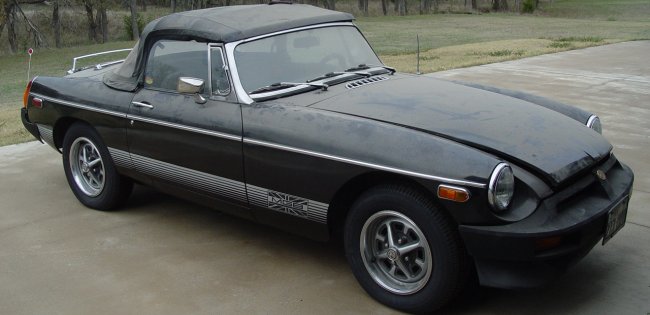
This classic British sports car is from the last year of the MGB model line. The current owner received title to it in exchange for the years during which it occupied his storage unit. We're told that it was running & driving when it was put into storage several years ago. A fresh set of tires were mounted so that it could be rolled out of storage and winched up onto our trailer for transport to Midlife.
The initial plan was to install a larger and more modern drivetrain along with some sensible upgrades to the running gear and then have it painted by an aquaintance of the owner. However, once here, the decision was made to go ahead and perform a full restoration in conjunction with the performance upgrades.
Stay tuned to see how the project progresses.
|
AS RECEIVED | ||
|
This B seems to be in solid shape. While the bonnet and boot lid have been kinked, the body and wings are solid and straight. Rust seems to have been kept to a minimum. Of course, it will need a new hood (top) and fresh upholstery, but otherwise the interior seems to be in decent shape. The engine bay will be gutted for the new engine (most likely a Ford V6). Overall, we've got a great basis for a nice British resto-mod restoration.
|
||
|
|
||
|
|
||
DISASSEMBLY | ||
|
Disassembly of this B was pretty straightforward. Aside from some stubborn fasteners, it all came apart quite easily. During the disassembly, all parts were inspected, evaluated as best as possible, and then inventoried before being placed into storage.
As with most projects like this, the real question as we start is what will we find under the paint, undercoating and general grime collected over 33 years. The outer body blasted clean in relatively short order despite one repaint. And while the liberal use of undercoating added significant time to our sodablasting efforts, underneath it all we found a virtually rust-free unibody. The only rust damage found was on driver's side dogleg just ahead of the rear wheel. Even the battery box looks great.
The engine and transmission were removed as a unit and are bound for listing on Craig's List and/or eBay. The front suspension subassembly and rear axle/spring assembly were sodablasted for inspection prior to deciding on any potential upgrades. All the running gear appears to be in easily rebuildable condition.
Overall, this turned out to be one very solid roadster. The only preexisting bodywork found is on the bonnet, boot lid and the middle of the rear deck. There are numerous small dings, but the only significant bodywork that is required is on the bonnet and boot lid.
|
||
|
|
||
BODYWORK | ||
|
We treated the entire unibody to a mild acid wash to etch the metal and remove/neutralize the remaining baking soda residue. We then coated the underbody with POR-15 rust-inhibiting coating. The outer body, interior, engine bay and boot with PPG's DPX 171 etch primer
Bodywork on this MGB is turning out to be minimal. The only rust-through we found was in the dogleg just behind the bottom of the driver's door. The 2" x 3" section of rusted steel was cut out and a small section of body steel was welded in it's place, then smoothed with lead body solder. With very few exceptions, the rest of the body flaws required just minor filling with a thin coat or two of plastic body filler. A couple of minor dings and creases (at the base of the sideview mirror mount and one of the front marker lights) were assisted with a bit of minor massaging with a body hammer and dolly.
The bonnet had sustained enough damage for us to opt for a reproduction replacement rather than repairing it. The boot lid also sustained some damage - including some structural cracking of the support framework underneath where the prop mechanism attaches. The cost to replace vs. repair is close enough for us to opt to repair it rather than purchase a replacement.
After the initial bodywork was completed, we applied 4 coats of PPG's high-build primer. The body will be left in build primer to cure for at least 2 weeks to let the body filler cure and go through the majority of its shrinkage before we start block sanding.
|
||
|
|
| |
| Send Mail to |
| bob@midlifeclassics.com |
| |